Steps to be followed
- Pay $99
- Certificate Signing Request
- Download your certificate
- Add your device
- Create an App Id in portal
- Provision
- Deploy
1. Pay $99 to greedy Apple a.k.a Signup for Iphone Developer Program
Yes you heard it right, pay $99 even if you want to develop & install app on your own device.
This is very simple process. All you have to do is goto http://developer.apple.com/iphone/program/
I've been a web developer for years and all the clients are keen on one thing; user should be completing the payment process with minimum no. of steps. Jobs & co is no different; just like that a $99 bill be charged on your card.
May be Apple wants to beat Microsoft/Gates in world richest race.
2. Certificate Signing Request
Open
Keychain Access from your
/Applications/utilitiesPlease follow the below steps to create
.csr file


Login here http://developer.apple.com/iphone/ with your Apple Id which costs you $99
Click "Iphone Developer Program Portal" on the right of the page.

Click the "Certificates" from the left side menu.
Click the "Request Certificate" from the page. Find the below steps to create & download you developer certificate.

click the Request Certificate

upload the .csr file we created earlier
3. Download developer certificate

your Team Agent or Admin has to approve the certificate request. Only then you will be issued a certificate. Since I was using Team Agent account, I approve myself. You need to logout and re-login to download the certificate.

Double click the downloaded certificate to install the same in you keychain.
4. Register your device
Click the "Devices" link on your left menu of the portal to add the device.
WARNING:You can have only 100 registered devices per account. Removing a device from your registered device will not release your retain count.
Ok! you have been warned. Now, you can proceed the following to register your device.
5. Create App ID
Next step is to add an application. Please follow the steps to add an applicaton in you portal. This will be used to group your devices/application/developer_cert.
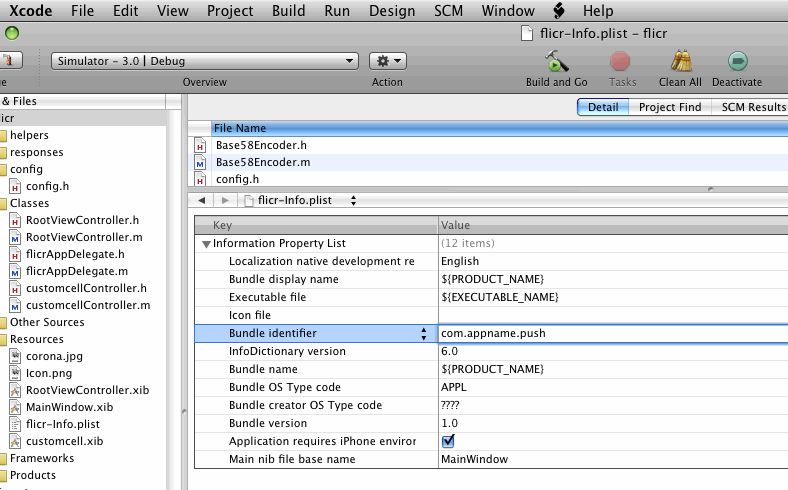
Bundle Identifier
Fill the below screen to complete the AppId process. Kindly make sure you remember the bundle identifier provided here. It will be used when compiling the build for device.
com.domainname.appname is the preferred naming convention from Apple. But com.domainname.* is also valid, you should not use wildcard * if you want to implement either Push Notification or In App Purchase features.
6. Provisioning Profile
It connects all the above dots. It is the file to be used with the application while deploying on device.
Refer the below steps to create a provisioning profile. You need to select the developer certificate, App Id and the device.
logout and re-login to portal in order to download the provisioning profile just created.
Install the profile in your device by opening
window->organizer from xcode menu.
Select the device from left menu.
Hit the
+ button of provisioning listbox.
This will open the dialog and locate the provisioning profile you had downloaded earlier.
7. Deploy
Goto your
info.plist of your project file. Edit the "
Bundle identifier" to the bundle identifier you had entered in
step 5Goto
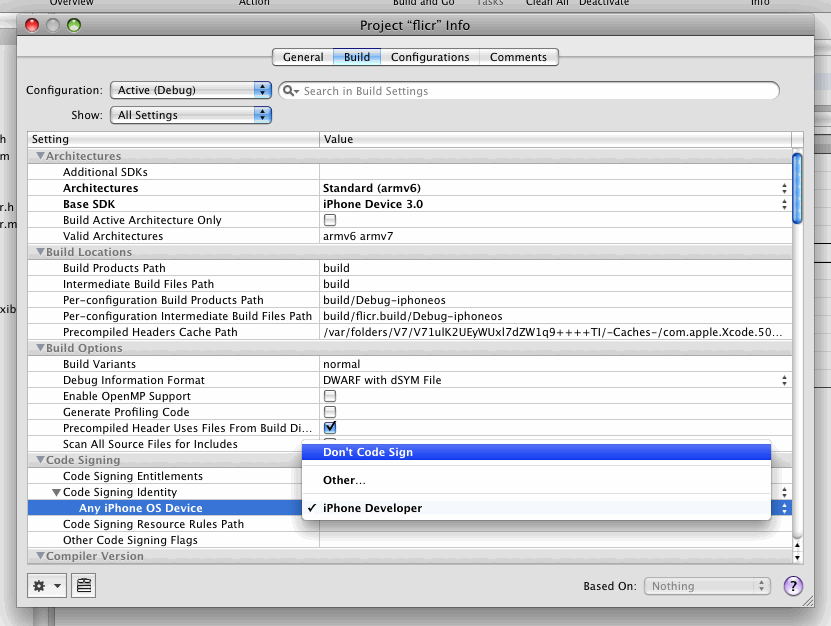
Project -> Edit project settings to open project info window.
In "
Build" tab, you need to edit the following settings.
- Change "Base SDK" to match your device version eg: iPhone Device 3.0
- Change the "Any iPhone OS Device" under "Code Signing Provisioning Profile" by selecting appropriate provisioning profile
- Make sure that the device is connected to your system and hit Build & Go.
Thats it. You had successfully installed the application on your device.
Common errors are related to invalid "
Bundle Identifier" and "
code signing profile" so make sure that you had provided correct information for both.
happy coding...